
A red dot that looks dialed in at the bench will betray you the moment
conditions change: sustained rapid fire, a fast weapon transition under stress,
or a hasty shot from an awkward position during vehicle egress. The optic
shifts, the mount walks, or you simply never established a true zero to begin
with, and now your point of impact is somewhere south of where it needs to be.
That gap between where the dot sits and where the round lands is not a trivial
issue; for a duty-ready carbine, it is a mission-critical failure.
Getting a precise, repeatable zero on an AR-15 red dot requires
understanding the physics involved, not just following a rote procedure. The
two most common starting points are the 25/50-yard zero and the 36-yard zero,
and the choice between them has real consequences for how the rifle performs
across the engagement distances you face. Neither is universally superior; the
right answer depends on your barrel length, your ammunition, your mount height,
and the operational context the rifle is built for.
Before you touch a turret, it helps to understand what zeroing
accomplishes at a mechanical and ballistic level. The red dot's reticle
projects along a straight optical line. Bullets do not. The bullet, by
contrast, travels in a curved arc: it exits the bore slightly below the line of
sight because the bore sits below the optic, climbs through the line of sight
at a near distance, arcs upward to a peak, and then descends back through the
line of sight at a farther distance. Zeroing is the process of mechanically
aligning the reticle so that the straight optical line and the curved bullet
path intersect at your chosen distance. Every variable that affects the shape
of that arc, including barrel length, cartridge velocity, projectile weight,
and optic height above the bore, changes where those intersections occur.
The primary variables that govern zeroing performance on an AR-15 red dot
are:
- Optic mounting height, specifically whether the mount
places the optic in absolute co-witness or lower 1/3 co-witness position,
which directly determines the physical offset between the bore axis and
the line of sight.
- Ammunition velocity and
projectile weight: standard 5.56mm loads vary meaningfully between 55-grain and
62-grain configurations, and those differences affect the arc's shape
across distance.
- Environmental conditions, including wind drift,
temperature-driven velocity changes, and altitude, all of which compound
at distance and can shift an otherwise solid zero.
Understanding the
Ballistic Arc and Zeroing Distances
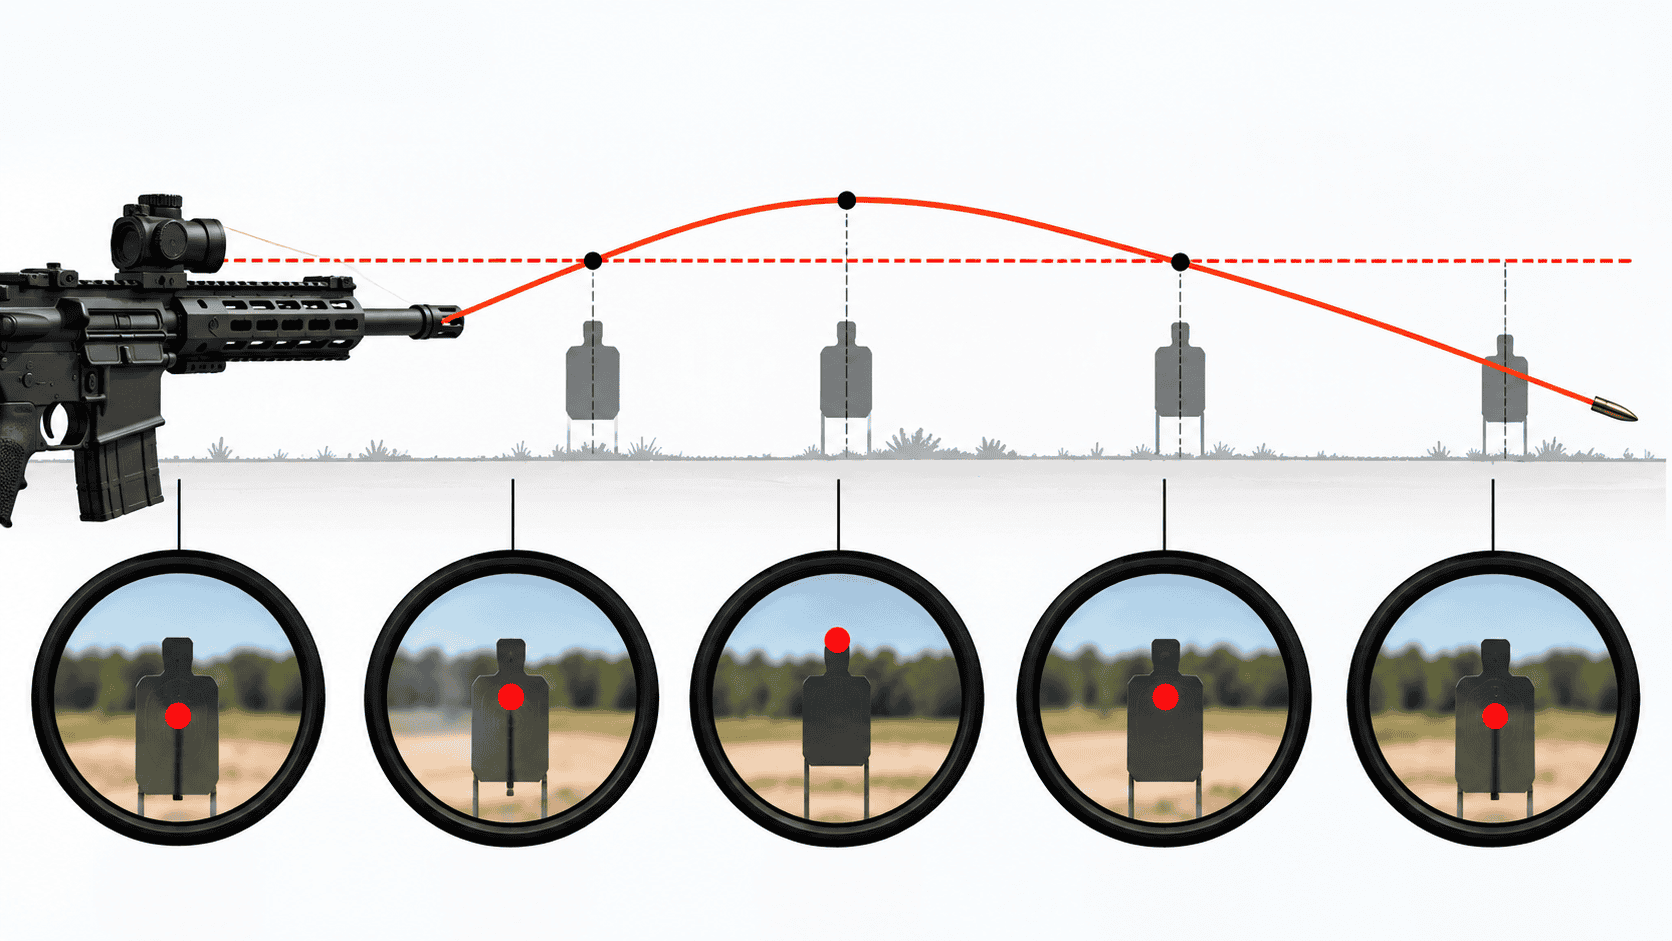
The 50-yard zero is the most widely adopted starting point for a
general-duty carbine, and the reason comes down to ballistic trajectory
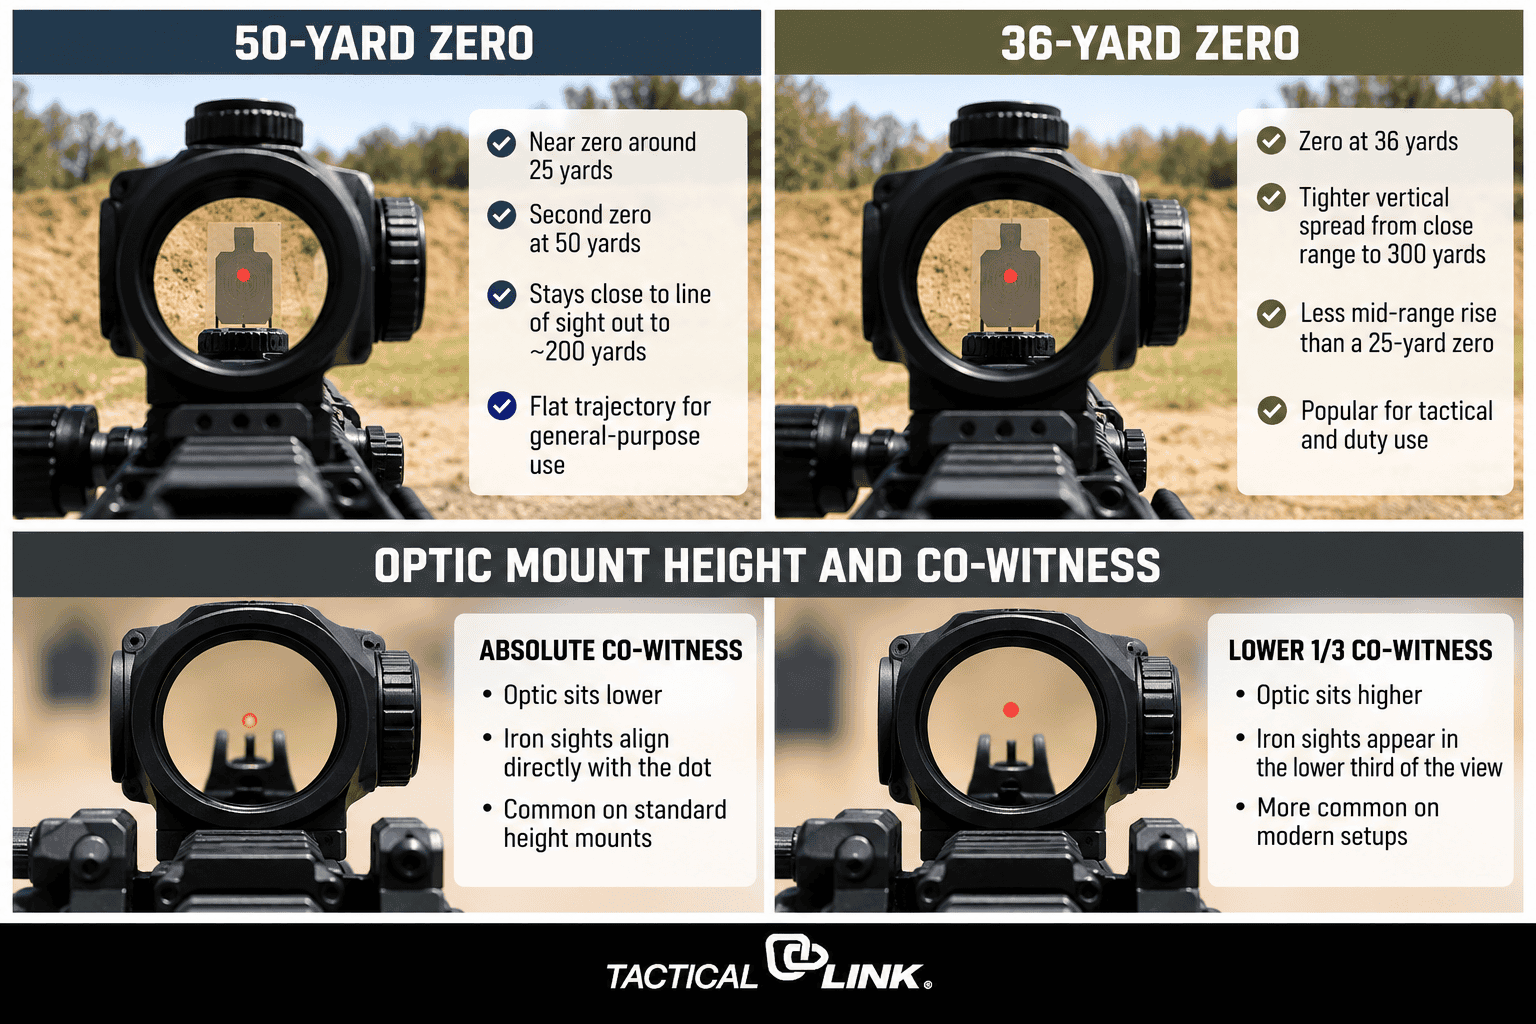
geometry. When you zero at 50 yards, the bullet's arc crosses the line of sight
on the way up at a short near-zero distance, then crosses it again at 50 yards.
Because the arc is relatively shallow at this stage, the bullet's point of
impact stays close to the line of sight through much of the mid-range, crossing
back through it again at roughly 200 yards depending on the specific load and
barrel length. The practical result is a flat trajectory across the distances
where most carbine engagements occur, with minimal holdover required from close
quarters out to moderate range. This flat trajectory simplifies aiming.
For exact trajectory data specific to your cartridge, the Federal Premium Ballistics calculator is the most reliable tool
available: input your specific load, barrel length, and zero distance to get
precise deviation values at each distance increment rather than relying on
generic approximations.
The 36-yard zero takes a different geometric approach, one favored
by many tactical units for its tight vertical spread across a wide distance
band. By zeroing at 36 yards, the bullet's arc is configured so that the
mid-range rise, which is the peak of the arc above the line of sight, stays
compressed. Compared to a 25-yard zero, where the bullet climbs noticeably
higher before descending back through the line of sight at a longer distance,
the 36-yard zero keeps the bullet's deviation from the line of sight narrower from
close quarters out toward 300 yards. The tradeoff is that it requires a precise
understanding of where the bullet sits relative to the reticle at very close
distances, where height-over-bore offset becomes the dominant factor rather
than the ballistic arc itself.
Optic Mounting
Height and Co-Witness Dynamics
Mount height is not a cosmetic decision. The distance between the center
of the bore and the center of the optic's optical axis, which is the
height-over-bore, determines how much offset the shooter must account for at
close range. It also directly influences which zero distance produces the most
useful trajectory geometry for a given application. Two mounting configurations
dominate the AR-15 platform:
- Absolute co-witness places the optic at the same
height as the standard AR-15 iron sights, so when you look through the
optic window, the red dot sits directly on top of the front sight post.
This configuration produces a lower height-over-bore measurement, which
means the bullet exits the bore closer to the line of sight. At very close
distances, inside 10 yards, the bullet's point of impact will still be
below the dot, but the offset is smaller than with a taller mount. The
tradeoff is a congested sight picture when both the dot and the iron
sights are visible simultaneously.
- Lower 1/3 co-witness mounts the optic slightly
higher, positioning the iron sights in the lower third of the optic window
rather than at the center. The field of view through the optic remains
cleaner, with the irons available as a reference without crowding the
sight picture. The higher mount increases the height-over-bore, which
amplifies the close-range offset. At distances inside 7 to 10 yards, the
bullet impacts noticeably lower than the dot's position. Shooters running
this configuration need to internalize this offset to ensure snag-free
deployment and accurate placement.
- The practical consequence of height-over-bore on zeroing
is clear: the taller the mount, the more the near-zero distance shifts,
and the more pronounced the bullet's initial climb through the line of
sight becomes before settling into the arc. Neither configuration is
wrong, as they serve different priorities, but the mount height must be
known and accounted for before selecting a zero distance.
Pre-Range
Preparation and Mechanical Zeroing
Arriving at the range with a loose mount or an optic that has never been
mechanically centered is one of the most common ways to squander an entire
zeroing session. The rifle needs to be mechanically ready before the first
round goes downrange. Three preparatory steps dictate your success:
- Torque specifications are strict operational
requirements, not suggestions. Every optic mount has a
manufacturer-specified torque value for the mounting screws. This value
exists because under-torqued hardware will shift under the recoil impulse
of sustained rapid fire. Use a calibrated torque wrench, not a feel-based
hand-tighten, and confirm the value against the mount manufacturer's
documentation before you leave the bench. Just as a mil-spec magazine
maintains spring tension over thousands of cycles, a properly torqued mount
maintains zero under repeated recoil.
- Establishing a mechanical zero means centering the optic's
windage and elevation turrets before you start adjusting for point of
impact. Count the total number of clicks available in each direction,
divide by two, and set the turrets to the midpoint. This gives you the
maximum available adjustment range in both directions and ensures you are
starting from a known reference point. Vortex Optics publishes standard user manuals
for their red dot lineup that detail this procedure: consult your specific
optic's manual for the exact process, since turret designs vary.
- Bore-sighting at 10 to 15 yards before heading
to your zero distance saves ammunition and frustration. Remove the bolt
carrier group, look through the bore from the chamber end, and align the
bore's center with a target at that short distance. Then adjust the red
dot to match. This gets the first shot on paper without burning through
rounds chasing a point of impact that may be off the target entirely at 25
or 50 yards.
Step-by-Step Range
Zeroing Procedure
Human error is the variable that derails more zeroing sessions than any
equipment issue. The solution is to remove as much of it as possible before the
first shot. Set the rifle in a stable shooting rest, a lead sled, or solid
sandbags in the prone position: anything that holds the rifle consistently and
eliminates shooter-induced movement from the equation. Start at 25 yards
regardless of your intended final zero distance. Fire a 3-round group with
measured trigger control and a consistent cheek weld, then assess where those
three rounds landed relative to the center of the target. This baseline
group tells you the direction and magnitude of your initial adjustment
before you move to your final zero distance. If the group is tight but
displaced, the optic needs adjustment. If the group is scattered, the problem
is technique, and no amount of turret adjustment will fix it. Focus on your
breathing.
Once you have a tight, representative group, adjust the turrets to move
the point of aim to match the point of impact, or more precisely, to move the
point of impact to match where the dot sits. Read the turret markings
carefully: most optics mark the direction of impact movement (U for up, D for
down, R for right, L for left) and indicate the click value, which is typically
expressed in MOA or MRAD per click. Do not assume a universal value. Consult
your optic's manual for the exact click value because it varies between
manufacturers and even between models from the same manufacturer. Calculate the
number of clicks needed based on the measured deviation of your group from the
desired point of impact. After adjusting, fire another 3-round group to confirm
the correction before moving to your final zero distance. Make the windage
adjustment and elevation adjustment independently, not simultaneously, so
you can track the effect of each change cleanly.
"A precise zero is not merely about hitting paper; it
is about ensuring your point of aim matches your point of impact under
sustained rapid fire and high-stress weapon transitions."
Troubleshooting and
Mitigating Common Zeroing Mistakes
A shifting point of impact between groups, where one 3-round cluster
lands in a different location than the previous one despite identical
technique, almost always points to a hardware problem rather than a shooter
error. The first thing to check is the mount. Check every screw. Run your
finger along every accessible screw and fastener on the optic mount and the
rail interface. If anything moves under hand pressure, it will move under
recoil, and no zero will hold. Loose mounts are the single most common
cause of unresolved point-of-impact shifts. They are easy to miss on a visual
inspection because the movement can be sub-millimeter at the mount but
translate to several inches of deviation at 50 yards.
Inconsistent cheek weld is the second primary source. The red dot is a parallax-sensitive optic
at close range: if your eye position changes between shots, the dot's apparent
position relative to the target changes with it. This does not mean the zero is
wrong; it means the technique is inconsistent. Establish a repeatable stock
position and hold it across every shot in the group.
A third issue that catches shooters off guard is dot distortion,
where the red dot appears as a starburst, a smear, or a cluster of points
rather than a clean circle. This is almost always a function of the shooter's
ocular astigmatism rather than a defect in the optic. To verify, take a
smartphone photo through the optic: if the dot appears clean in the photo but
distorted to the naked eye, the optic is fine, and the issue is the shooter's
vision. A practical field fix is to look through the rear aperture of the iron
sights while also viewing the red dot: the aperture acts as a corrective lens
for mild astigmatism and can clean up the dot profile considerably. Shooters
with significant astigmatism may want to consult an eye care professional about
corrective lenses before investing further in red dot optics.
Environmental and
Regional Factors in Central Kansas
Shooters operating in Salina and across Saline County deal with
environmental conditions that can significantly alter a zero established under
different circumstances. The open terrain of central Kansas is not forgiving of
a zero that was dialed in on a calm indoor range and never verified outdoors.
- Wind drift is the dominant variable.
Central Kansas is exposed to persistent open-terrain wind that can push a
5.56mm projectile laterally at distances where the drift becomes
tactically significant. The practical mitigation is to zero on calm
mornings, early, before the wind picks up, or to use an indoor facility
where wind is eliminated as a variable entirely. A zero established in a
15 mph crosswind will not hold when the wind drops to zero, and vice
versa. Wind changes everything.
- Temperature variance across Kansas seasons is
substantial enough to affect ammunition velocity, which in turn shifts the
ballistic arc and alters the point of impact at distance. A zero confirmed
in August heat will not be identical in January cold. Re-verify the zero
before any hunting season, competitive event, or operational deployment,
especially after the rifle has been stored through a significant
temperature transition.
- The 50-yard zero is particularly well-suited to
the regional applications most central Kansas shooters encounter: coyote
and varmint control at variable distances, open-field engagements where a
flat mid-range trajectory pays dividends, and homestead defense scenarios
where the engagement distance is unpredictable. The versatility of the
50-yard zero across this distance band makes it the logical default for a
rifle that needs to cover multiple roles without a dedicated long-range
setup.
Verifying and
Maintaining Your Zero
A zero confirmed from a bench rest under optimal conditions is a starting
point, not a finished product. The confirmation course of fire should
replicate the conditions under which the rifle is used. Fire from multiple
positions, standing, kneeling, and prone, to verify that the zero holds across
different cheek weld geometries. Run a string of rapid fire to stress the mount
under the recoil impulse that sustained shooting produces. Recoil tests gear.
If the rifle is a vehicle gun or a patrol carbine, simulate a vehicle egress
before firing a confirmation group: the physical stress of exiting a vehicle,
the potential for the rifle to contact the door frame or seat, and the
transition from sling carry to ready position all introduce forces that a loose
mount will not survive with its zero intact.
Once the zero is confirmed, mark every mounting screw with a paint pen or
nail polish, a thin line drawn across the screw head and onto the mount body.
These witness marks make it immediately visible if a screw has rotated
even slightly. Check them every time the rifle comes out of the case. A shifted
witness mark is a preliminary indicator that requires re-torquing and
re-verification before the rifle goes back into service.
Frequently Asked
Questions
What is the
difference between a 25-yard zero and a 50-yard zero?
The fundamental distinction is the shape of the trajectory arc that each
zero produces across the practical engagement range of an AR-15. A 25-yard zero
places the near-zero intersection close to the muzzle, which means the bullet
climbs through the line of sight early and reaches a higher peak above the line
of sight at mid-range distances, typically somewhere between 50 and 150 yards
depending on the load, before descending back through the line of sight at a
longer distance. That mid-range peak translates to a more pronounced holdunder
requirement at intermediate distances: the bullet is flying higher than the
dot, so the shooter must aim slightly low to compensate.
The 50-yard zero compresses that mid-range rise considerably. The
bullet's arc stays closer to the line of sight across the 0 to 200 yard band,
producing a flatter, more consistent point of impact without the same degree of
holdunder or holdover correction. For a carbine expected to perform across a
wide range of distances without the shooter doing mental arithmetic on every
shot, the 50-yard zero is the more forgiving choice. The 25-yard zero has its
place: it is useful for shooters who primarily operate at very close distances
and want a known, predictable offset, but it demands more active compensation
at the distances where the 50-yard zero is essentially self-correcting.
How do I know if my
red dot is absolute or lower 1/3 co-witness?
Look through the optic with the rifle at a natural shooting position and
observe where the front sight post sits within the optic window. If the red dot
appears to sit directly on top of the front sight post, with the post centered
vertically in the window, the mount is configured for absolute co-witness. If
the iron sights appear in the lower portion of the window, occupying roughly
the bottom third of the visible field while the upper two-thirds remain clear,
the mount is lower 1/3 co-witness. There is no ambiguity between the two once
you understand what you are looking for. If you are purchasing a mount and want
to confirm the configuration before buying, the mount manufacturer's
specifications will list the optic height above the rail, and that measurement
determines which co-witness geometry the mount produces with standard AR-15
iron sights.
Why does my red dot
look like a starburst or cluster of grapes?
This is almost certainly your eyes, not the optic. Optics do not bend
light. Ocular astigmatism, an irregularity in the curvature of the
cornea or lens, causes the eye to perceive point light sources as elongated,
smeared, or multi-pointed rather than as clean circles. Red dot reticles are
point light sources, which makes them particularly susceptible to this
distortion. The optic itself is projecting a clean dot; the visual system is
distorting it on the way in.
The most straightforward confirmation is to photograph the dot through
the optic with a smartphone camera. If the dot appears clean and round in the
photo but distorted to your naked eye, the optic is functioning correctly, and
the issue is your vision. A practical range fix is to look through the rear
aperture of the iron sights while using the red dot: the aperture can act as a
corrective element for mild astigmatism, tightening up the dot's appearance.
Shooters with significant astigmatism may find that a low-power variable optic
or a prismatic sight with an etched reticle serves them better than a standard
red dot, since those reticles do not rely on a point light source.
How often should I
re-verify my AR-15 red dot zero?
Re-verify before any significant use, such as a hunting season, a
competition, or an operational deployment, and after any event that could have
disturbed the zero. A drop, a hard impact, extreme temperature exposure, or a
period of storage where the rifle was transported repeatedly all qualify. The
witness marks on the mounting screws give you a passive early-warning system:
if the marks are undisturbed and the rifle has not been subjected to any
unusual stress, a brief confirmation group at your zero distance is sufficient.
If anything looks shifted, go back through the full zeroing procedure rather
than assuming a minor adjustment will correct it. A zero that is close is not
the same as a zero that is confirmed.
Can I zero my red
dot at 10 yards?
A 10-yard distance is appropriate for initial bore-sighting, getting the
first round on paper before moving to your target zero distance, but it is not
suitable as a final zero. The reason is height-over-bore. At 10 yards, the
bullet has not yet climbed through the line of sight; it is still below the
optic's optical axis because the bore sits below the optic. The point of impact
at 10 yards will be lower than the dot by an amount equal to the height-over-bore,
which means a zero established at that distance is not a true ballistic zero;
it is simply an alignment of the dot with the bore's mechanical axis at a
distance where the bullet has not yet intersected the line of sight. Moving to
25 yards for an initial zeroing group, then to your final zero distance,
produces a meaningful and repeatable result that a 10-yard zero cannot. Since
2003, Tactical Link has developed mil-spec components trusted by military and
law enforcement professionals who expect absolute reliability under
real-world conditions. A duty-ready rifle demands uncompromising precision at
every layer, from the torque on the mount screws to the confirmation group
fired under realistic operational conditions. A correctly aligned red dot is
not an accessory; it is the mechanical foundation that makes every
subsequent skill the shooter brings to the rifle count. The zero you establish
today is the one your point of aim depends on when conditions are worst, and
the margin for error is smallest. Take the time to do it correctly, verify it
under stress, and maintain it with the same discipline you apply to every other
aspect of carbine readiness. Zeroing is life insurance.
Contact our technical support team in Salina for professional assistance
with your optic setup.


